VALPRO PRODUCT INSTRUCTION MANUALS
Connecting the “Flexi spout” to a screw cap can
For products with No. 1169.00, 1169.00-02
The spout is compatible only with VALPRO manufactured 5L, 10L and 20L metal fuel cans.
VALPRO takes no responsibility for the compatibility of the spout with other manufacturer fuel cans.
To prevent vacuum formation in the fuel can and to ensure fast and convenient fuel dispensing, the spout is specially equipped with an air channel that allows air to enter the can during pouring.
Place the fuel can on a flat, stable surface.

Open the fuel can by screwing the cap counterclockwise.

For your convenience, place the removed cap on the fuel can with the help of the incorporated magnet.
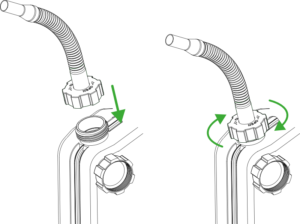
Screw the spout on by turning it clockwise until you feel resistance of the seal. Then turn the spout an additional 1/6 of a turn.
The fuel flow from the spout does not stop automatically. Monitor the fuel level during use and stop pouring in time. A small amount of fuel may leak from the air hole when starting or stopping the pouring process. When transporting the fuel can, the spout should be removed from the neck of the fuel can, as it does not ensure that the fuel can is airtight
VIDEO INSTRUCTION: